Fill in the meat of your content, building on top of the skeleton outline you now have created for your writing work.
FROM THE MIND mapping view, we'll now move into the content editor within each node.
In this space, you can expand on each of the headers of your document, fleshing out your points and arguments to create a full and complete draft.
Let's go over each of the features that aid in this step of the writing workflow.
The content editor has been designed for focus, helping you to write, edit, and format distraction-free — but that doesn't mean no-frills. Besides being able to edit text, the app's content editor is able to perform a couple other functions.
As a starting point which should be familiar to you by now, each node in your WriteMap is able to open up into a content editor, triggered via either the toolbar, or its corresponding keyboard shortcut, Cmd/Ctrl+E.
Next, besides opening up the full content editor, you may also open it up into a simplified editor, while keeping the mind map in the background. To engage Quick Edit Mode, right click any node and select Quick Edit Node.
You can set the speed at which the content editor animates into place, via the Animations setting, which you may find in the Editing tab of the Settings window. Fast, slow, or even totally removing animating the editor in and out — take your pick!
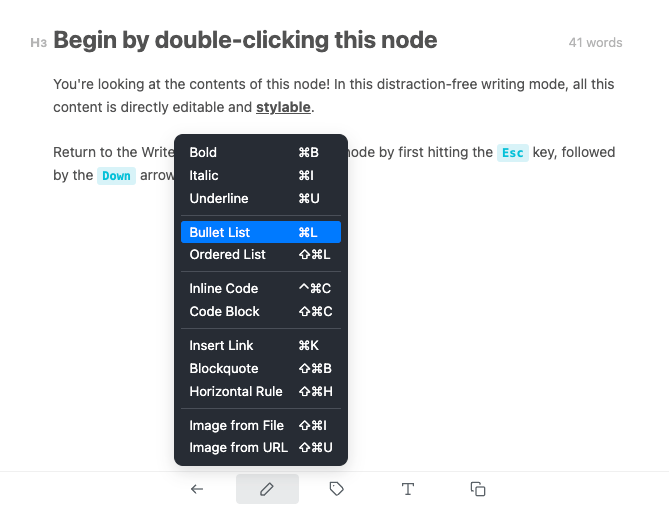
Besides typing plain text, the content editor allows you to style and organize your writing using several common rich text formats, such as bold, underline, italics, and more.
Discover the full list of formats supported in WriteMapper from the Formats menu in the content editor's toolbar, which is the second button from the left.
Writing using Markdown-style syntax is possible in the content editor. If Markdown formatting is detected as you type, the app automatically converts that typed snippet into the corresponding format, without requiring any additional action on your part.
TIP: Your WriteMap can also be exported to as a document in Markdown format, which we'll be learning more about later on in Part 4 of the User Guide.
Inserting Images
The content editor supports inserting images, giving you an additional way of illustrating ideas in your document.
You may do so via the content editor's toolbar, which gives you two options to insert images, depending on if you're inserting from a URL, or from an image file.
Saved Within WriteMaps
Regardless of which method was used to insert the image, after inserting it into your WriteMap, the image file is saved within your WriteMap file.
This helps to ensure that the image remains intact in your document, even if the original image was moved or deleted.
Exports Where Compatible
Not all the export formats available in WriteMapper compatible with images. For instance, the TXT format only accepts plain text as part of its document specification. Where possible, the app will try to include your images in the export formats that support them.
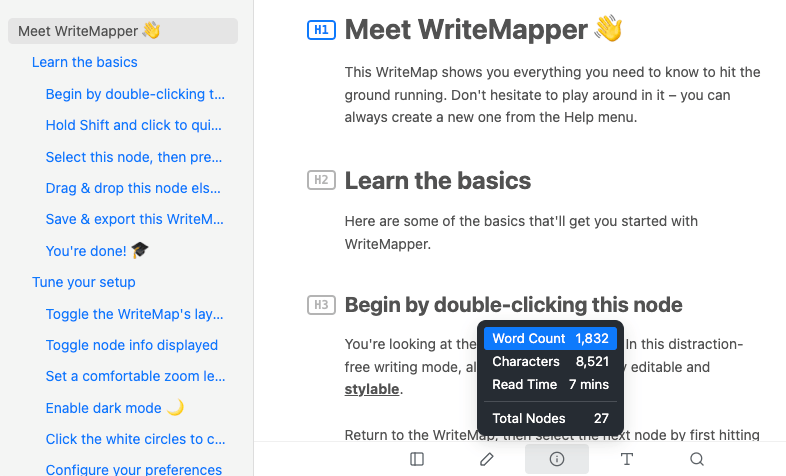
Remember the node info displayed on the right side of nodes in the WriteMap view? That information, whether you've configured it to show the node's position or word count, is also available for easy reference in the top right hand corner of the content editor.
You are also able to set the font size of the text in the content editor. Changing it from the editor's toolbar temporarily changes the font size, and resets the next time you open the content editor again.
To enforce a text size to be applied every time you open up the content editor, change the Default Editor Font Size setting in the settings window, which you may find under the Editing tab.
On macOS, insert emoji and symbols from the Character Viewer, which can shows up when you press Fn+E keyboard shortcut. Please refer to this article from Apple for more information.
On Windows, you can insert emojis and symbols with the emoji panel. Press the Win+. keyboard shortcut during text entry, and the emoji panel will appear. For more information about this, please refer this article from Microsoft.
In the WriteMap view, your writing work is broken down into separate, discrete chunks. The Document View is another view of the same document that opens up in a separate window.
In it, you are able to view your document as a singular, continuous piece of writing. This view is great for going over the work you have created in the app thus far. For example, you may use it for proofreading, checking the consistency and flow, while keeping an eye out for possible errors.
To show the Document View, press the Cmd/Ctrl+4 keyboard shortcut.
Make Edits In Document View
In the Document View, besides being able to view your document, it's possible to also make in-place edits to the titles and contents of nodes.
Each node and its contents shown in the Document View is actually also an editor, not dissimilar to the content editor available in the main WriteMap view.
However, in order to prevent the hierarchical structure of the document from being modified in unexpected ways, please note that you are not able to make structural changes to your document from this view, such as rearranging or adding new headings.
Activating The Editor
To activate a node's editor and begin editing, simply click in the text where you would like to begin editing, and same for if you would like to edit a node's title; then type away!
In the heading marker to the left of the node's title will highlight with the node's color instead of the normal gray, indicating that this node's editor is currently active.
Real-Time Data Consistency
As you type and make changes from the Document View, the same changes will be reflected in the main WriteMap window, keeping the data of your document consistent across each view.
The same is true in the opposite direction — when you make changes in the main WriteMap window; the new data is propagated to and updated in the Document View window if you have it open at the same time.
To the left of the Document View lies the content outline, in which contains the content structure of your document. It's useful for navigating your document, especially if its contents are rather long.
Clicking any of the headings present in the content outline will focus and reveal that node in the Document View.
You may also toggle the visibility of this content online sidebar using the leftmost button in the toolbar.
Just like in the content editor, you are able to adjust the font size of the text displayed in the document view from the toolbar.
To make it easier to locate the corresponding node in the mind map view, right-clicking a node's title or contents will reveal the Show Node In WriteMap option which, when clicked, will scroll to and focus that node in the WriteMap view.
Some helpful information about your writing is automatically computed and displayed from the Info button in the Document View's toolbar, located in the middle, including the document's word count and total number of nodes.
Writing continuously for an extended amount of time, no matter how engaging the subject at hand, can get tiring. Here are a few methods that can help you increase your writing productivity in WriteMapper.
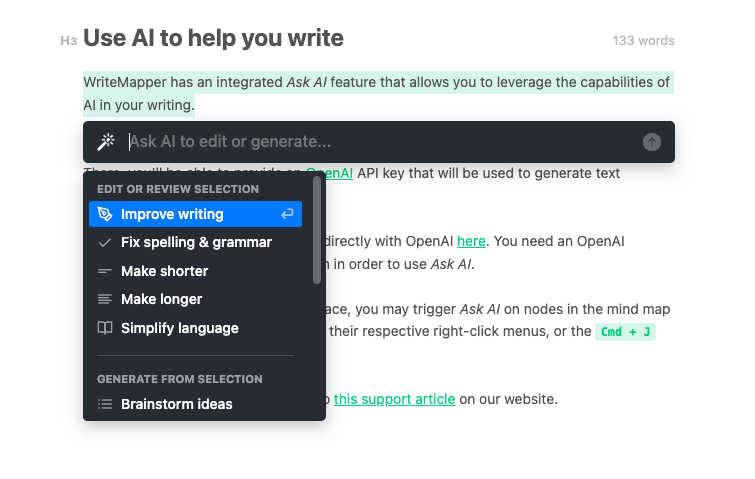
Similar to using the Ask AI feature in the WriteMap view, you may also ask AI to brainstorm ideas and generate content for you in the content editor.
Selecting some text in the content editor and triggering the Ask AI function sets it up to have the highlighted text included as part of the contextual information of your request to OpenAI, and allowing you to ask the AI to modify or add to it.
If no text is selected, then the context used to request to OpenAI's servers will be the node's title.
TIP: Using talk-to-type over typing the traditional way using a keyboard can help to increase your writing speed and reduce typing fatigue.
WriteMapper is dictation-ready on macOS and Windows. Learn more about voice typing on Windows from this support article by Microsoft, and more about dictating documents on macOS from this support article by Apple.
We've optimized WriteMapper such that it can handle large WriteMaps. The app has been tested to maintain smooth performance, even for mind maps with more than a few hundred nodes, in all mind map layouts, so you can continue writing full speed ahead.
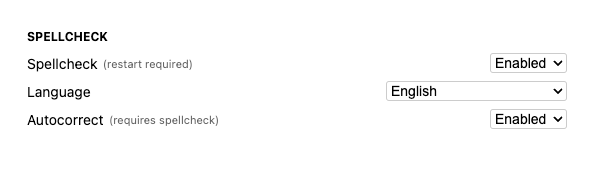
Spot and correct typos with ease and correct misspelled text as you type. Spellcheck and Autocorrect are both features available in WriteMapper which go towards creating a smoother typing experience.
Basic Usage
With spellcheck enabled, a dotted red line will appear underneath any misspelled words. Right clicking the misspelled word will show a list of possible corrections. Selecting one of them will replace the incorrectly spelled word with it.
Learn New Words
Spellcheck can also learn new spellings. To learn the spelling of a misspelled word (with Spellcheck enabled), right-click it and select the very last option in the context menu, "Add to Dictionary". To unlearn that spelling and remove it from your dictionary, right-click a word previously added to your dictionary and select "Remove from Dictionary".
Configuring Settings
You may enable spellcheck from the settings menu, under the Editing tab. The Language setting located directly below the Spellcheck setting specifies the language used for spellchecking. Please note that it is required to restart the app in order to apply any new spellcheck settings.
Basic Usage
When enabled, Autocorrect immediately corrects misspellings as you type each word. It uses an algorithm to determine if your typing should be corrected, based on the similarity of the suggested correction.
Configuring Settings
Autocorrect may also be enabled or disabled from the Settings window. Please note that it requires spellcheck to be enabled in order to work.
Now with your writing work now mostly completed, it's on to the last part of the User Guide — Part 4: Finish.
WriteMapper is a software tool that uses mind maps to help you skyrocket your writing productivity.
Learn More User GuideWriteMapper
Support
Use Cases
Toggle Dark Mode
Apple, the Apple logo, Apple Watch, iPad, iPhone, and iPod touch are trademarks of Apple Inc., registered in the U.S. and other countries. WriteMapper is a product of BETTERWEBPAGES.
© BETTERWEBPAGES 2017-2024. All rights reserved.